 icon:
icon:Creating lines (or rows) is the first step in developing your Input Definition. Lines allow you to define the row format and structure of your plan and can reflect:
•Descriptive rows of the reports, such as “Cash” or “Total Revenue”
•Any total or inter-row (line) calculations
•General Ledger codes
The information in a Line Definition is combined with the Column Definition in the Input Definition to define your plan.
To create a simple Line Definition:
1. Click on the Lines bar to open the Lines Navigation Pane.
2. Select the Line Definitions folder
3. Click
on the New  icon:
icon:
a. Type a name and label for the new Line Definition in the New Lines pop-up box.
b. Click OK.
4. Click the Build option on the ribbon. A list of available accounts will appear.
5. Select one or more accounts from the list, and then click the OK button. (Prospero will then add the selected account(s) to the Lines Definition.)
6. To insert additional rows:
a. Select a cell in the Lines workspace and right-click.
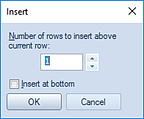
b. Select the Insert lines option to open the Insert window.
c. In the
Insert window, select the number of lines to insert. You can specify inserting
above or below the current line by checking the Insert at bottom
checkbox.

d. Select the OK button to confirm your action.
7. To remove a row:
a. Highlight the entire row in the Line Definition workspace grid.
b. Right-click to display the pop-up menu.
c. Select the Delete lines option.
d. When prompted, select the Yes button to confirm your delete action.
8. Click Save or Ctrl+S to save the new Line Definition.