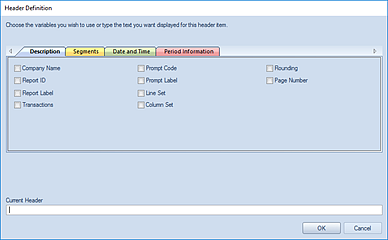
Selecting the ellipsis button on the Header or Footer row in your Report Definition’s Headers and Footers tab will return the Header or Footer Definition screen. (The Header or Footer screens contain identical options, therefore, only the Header Screen will be shown here.)
Select one or more Header or Footer code value via the checkbox and the syntax will automatically populate in the Current Header or Current Footer field in the screen and Report Definition workspace.

The available options on the Headers or Footers Definition Description tab include:
|
Header Value |
Header Syntax |
Information Displayed |
Example |
|
Company Name |
@ORG |
Displays the entity name, which will most often be the company name |
“Company A” |
|
Report ID |
@REPORTID |
Displays the report ID |
“CF” |
|
Report Label |
@REPORTLABEL |
Displays the report label |
“Cash Flow Report” |
|
Published Label |
@PUBLISHEDLABEL |
Displays the published report label |
“Cash Flow Report” |
|
Transaction |
@TRANS |
Displays the corresponding informational value for the transaction setting (i.e. types of transactions shown on drill down) selected for the report. (See the Report Definition Options Tab) |
“None” “Posted Only” “Both” |
|
Prompt Code |
@PROMPTCODE |
Displays the prompt code |
“All-All-All” |
|
Prompt Label |
@PROMPTLABEL |
Displays the prompt label |
“Company ABC-Miami Operations-Sales” |
|
Line Set |
@LINE |
Displays the Line Set name assigned to the report |
“CashFlow” |
|
Column Set |
@COL |
Displays the Column Set name assigned to the report |
“12Month” |
|
Rounding |
@ROUND |
Displays the rounding setting on the report |
“No Rounding” |
|
Page Number |
@PAGE |
Displays the page number |
“1” |
After making your selection(s), click the OK button to accept the additions.