You can add new users in Prospero based on your organization’s requirements.
To add a new User:
1. Select the Security bar on the Prospero Navigation Pane.
2. Open the User Definition workspace using the User Definition icon
3. In the User Definition workspace, select a Role.
4. Select the Add User option from the Security Tools Security context ribbon or by right-clicking and selecting the Add User option from the pop-up menu.

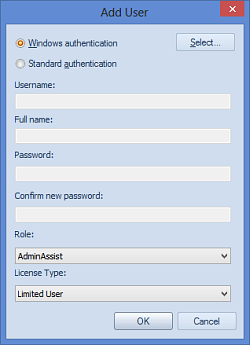
5. The Add User window will appear.

6. Enter the following information in the Add User window:
•Windows Authentication / Standard Authentication – If you use Windows Authentication, use the Select button to search for and select the user (by display name) that you wish to add to Prospero. Otherwise, switch to Standard Authentication and fill in the fields to define the new user.
•Username – Enter a user name for the new user. This will be the username they will utilize at login.
•Full Name – Enter the full name of the user. This will appear on the user’s workspace to identify them in the system.
•Password – Enter a password which the user may or may not be required to change when they next log in.
•Confirm new Password – Re-enter the password specified in the Password field for confirmation.
•Role – Select the role to which the new User will be assigned. If you have not selected the role from the User Definition tree grid before selecting the Add User link, the default role will be Unassigned. A new User can be assigned to an active role any time after creating the user’s account.
•License Type – Select from either Power User, Designer User, Standard User, Limited User, or Help Desk User license types.
The Role to which the user is associated will determine the required license type. You can leave this as the default license type for the Role selected.
For more information see Prospero Licensing.
7. Click
the OK button. The new User  will appear under the role to which they
were assigned.
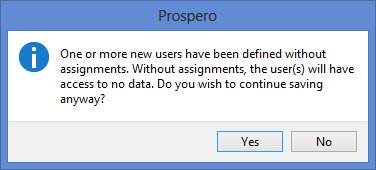
8. When creating a new, non-Administrative user in Prospero, you will receive an informational message that the user requires Assignments to be established for them before they will have access to any data in Prospero.

For more information on assigning Users and Roles access to specific segment selections, see the section on Assignments.
9. Optionally, after adding the user, you can click on the user icon to open the User Definition workspace. You can then change the full name, manage login messages, or flag the user as disabled or read-only.
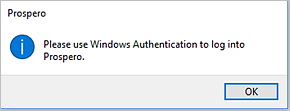
Note: Prospero allows Administrators to Allow Standard authentication for log in on the Security Configuration Options screen. This option allows you to specify that Standard Authentication is allowed for log in to the system. When unchecked, only Windows Authentication is allowed and users attempting to login with Standard Authentication will receive an error message:

In addition, when checked, all new users must be created using Windows Authentication only. Any users whose accounts use Standard Authentication, after this option is de-selected, will not be allowed to log in to Prospero. This option is checked by default.
And, for more information on permissions, see the section on Prospero Security Permissions.