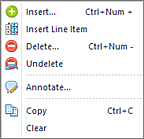
To modify, delete, or undelete data in your Data Input workspace:
1. Open the Input Definition for the parameters you require.
2. Use the Open Input button on the set to open the Data Input workspace or the Open Input option on the ribbon.

-or-

3. Enter your plan prompts as required.
4. In the opened workspace, select a row.
5. Select the Delete option on the ribbon.

Conversely, right-click and select the Delete option from the pop-up menu.

Your value will be ‘0’ and any totals row(s) will update.
6. When prompted, confirm that you want to delete your row.

7. (You can elect to suppress this message on the prompt. To restore these confirmation messages, you can select this in Options.)
8. To cancel the deletion of a row, select row and the Undelete option on the ribbon.

Conversely, you can right-click and select the Undelete option from the pop-up menu.

The Undelete option will undelete any data which had been deleted after the last save.
9. When you have completed entering data, select the Save button on the Quick Access Toolbar or Ctrl-S to save your work.
Note: You cannot undelete a row(s) after you have saved any deletions.