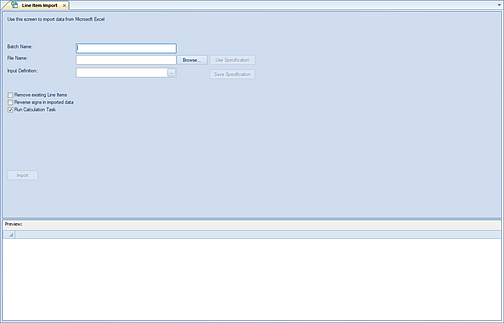
The Line Item Detail Import option allows you to import Input Definition Line Item detail data from a Microsoft® Excel file to update specific records.
The Import may include corresponding segment information that is not hidden on the input definition and which is not in the lines of the input definition.
The file should be in .XLS or .XLSX format. The .CSV format is not supported. For a sample Excel file format, refer to the file in your Prospero Client Directory.
Line Item Import is only available where you have licensed Prospero for Budgeting or Budgeting and Reporting. In addition, the Line Item Import option is only available for users who have permissions for both “Import Data” and “Input Data”. For more information, refer to Prospero Permissions.
To execute the Line Item Import:
1. Click on the Data Integration bar in the Prospero Navigation Pane.
2. Click
on the Line Item Import icon to open the Excel Import
workspace.

3. Enter a Batch Name. This allows field will be a label for the Excel import process up to 24 characters. The Batch Name field is a required field.
4. Enter or use the Browse button to select a File Name of the Excel file containing the data to be imported. The File Name field is a required field.
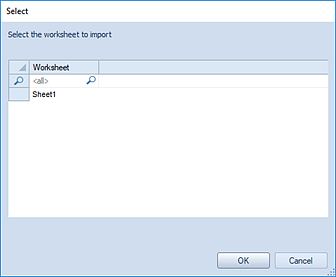
5. Once a
file is provided, you will be prompted to select the Excel worksheet tab within
the workbook containing import data.

If a <BLANK> worksheet is specified, you will receive an error message: "No importable data found in specified worksheet. Please select another worksheet."
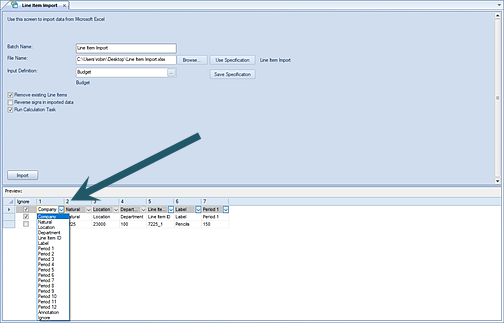
6. Select the Ok button. The data to be imported will appear in the Preview pane where you will map the segment field references to the data previewed.
7. Select the Input Definition. This option allows you to select the ellipsis button to choose an existing Input Definition.
Note: If the input definition is read-only or uses a Book Code which does not allow input, you will not be able to select Periods and the import process will not run even if you had previously imported data to it.
8. OPTIONAL: Select the Remove existing Line Items checkbox. When checked, existing line item input data will be replaced with information from the import file. When this option is not checked, the existing line item data will remain and the value will be added. This option is not checked by default.
9. OPTIONAL: Select the Reverse sign on imported data checkbox. When checked, this option will reverse the sign on each element in the imported data. This option is not checked by default.
10. OPTIONAL: Specify the Run Calculation Task option. When this checkbox is checked, a Calculation Task will automatically be run to update totals in the input data. This option is checked by default.
11. Select the Segment Field Mapping(s). Use the dropdown box in the Preview pane to select the segment to map your data to. You must map the segment field references to the data previewed.
Required fields are: Line Item ID and any other assignable segment information.

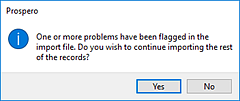
If you do not map your segment fields, you will receive a warning message to do so. In addition, if you map your segments to any invalid data or value you will receive an error message and a red box visual indicator will appear on the cell.

While you can continue the import process, you should carefully check your data after the import.
12. OPTIONAL: Select the Use Specification button option to select an existing specification for importing your data. The list of available specifications will be those which you have previously saved. If you have not previously entered/saved a specification this screen will be <BLANK>.
13. OPTIONAL: Select the Save Specification button and enter a name to reference the import parameters, criteria and mappings in future. The CTRL+S on the open dialog will also save the specification name.
Note: You must specify an Excel file name for the Use Specifications or Save Specifications buttons to activate.
For more information see Import Specifications.
14. Select the Import button to import the data.
Note: Each field name you specify in your import file must be unique. If you duplicate the field name for whatever reason, you will receive an error message when you attempt your import process and the import will not proceed.
In addition, if you import an Excel file and errors occur
during the posting process, you will receive a message that records have failed
the validation process and were not posted: “Import completed with validation
errors. Please check the import batch for details”.