To add employee records to your Human Resources Data Input workspace:
1. Open the Input Definition for the parameters you require.
2. Use the Open Input button on the set to open the Data Input workspace or the Open Input option on the ribbon.
3. Enter your plan prompts as required.
4. In the opened workspace, select the Human Resources tab.
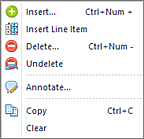
5. Right-click and select the Insert option from the pop-up menu.

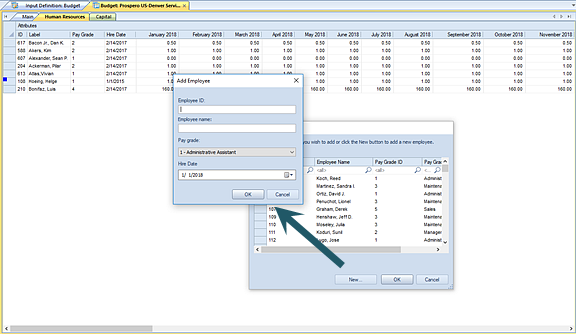
6. In the Add Employee dialog, select the New button to enter a new employee entry. Or, conversely, select an existing employee to add to the plan.

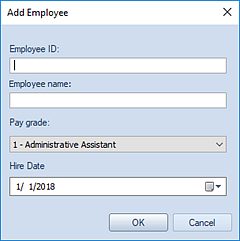
7. When entering a new employee record, enter the Employee ID, Employee Name, and Pay Grade from the drop-down menu.
In addition, enter or select the Hire Date from the Calendar widget. The default is the first day of the current calendar year. (The start period will be based on this value such that if the date “4/1/2019” is selected and the budget is for 2019, the start period will also be set to 4. If you are budgeting for 2019 and you pick 4/1/2018 as the hire date, it sets the start date to 1, as the employee would have already been hired prior to the start period. This value can be manually changed.)

Employee ID, Employee Name, Pay Grade and Hire Date are required fields.
When you have entered your employee data, select the Ok button. The employee record will be added to the workspace.
8. In the workspace, the employee records will reflect the attributes you assigned to the Human Resources setup in the Input Definition. These will be the fields which are available, grouped by their attribute which you can toggle on or off on the Human Resources Tools context ribbon.

9. Fields in the workspace will be grouped by their function:

You can modify editable values where you have rights to modify Human Resources data.
You can also add Benefits and Tax field values where you have defined these on the Input Definition. For more information, refer to the section on Adding Benefit or Tax Field Values.
10. After entering HR data, you can toggle back to the Data Input Workspace by selecting the Main tab.
Note: Whenever HR records are modified, resulting values are re-calculated and the corresponding account(s) are updated on the Main input tab.
If an account used to return HR data is not found in the associated Input Definition’s Line Definition, the row will be added to the screen. In this instance, the row will be hidden by default but can be un-hidden using the “Show Hidden Lines” option on the Input Tools Context Ribbon.
11. When you have completed entering data, select the Save button on the Quick Access Toolbar or Ctrl-S to save your work.
Note: If you have defined specific criteria on the Human Resources Pay Grade, Benefits, or Taxes on the Input Definition, opening the Data Input workspace will filter on that criteria based on your prompts.