Prospero supports organizations which use multiple general ledgers or have multiple companies comprising their organization through the Data Integration process. Prospero provides features allowing users to summarize data from different sources in to a common set of reports by “linking” or “consolidating” those sources within a single entity.
When establishing your consolidated entity, the following rules and structures apply:
•Entities are created and managed in the Entity Management workspace of the System Entity. You must log in to the System Entity as a Prospero Systems Administrator.
•All source entities which are consolidated must use the same structure for their chart of accounts.
•All organizations involved in a consolidation must be defined in the same Prospero database via the Entity Management workspace.
•The Consolidation Entity will contain all consolidated report definitions to allow for reports to run across the various source entities. Report definitions specific to a single company should only be defined in that company’s specific entity.
User access to a Prospero entity which is involved in a consolidation can be assigned and managed via Security and the User Definitions for that entity. In a consolidated organization where specific users should only view or manage reports for a single company or entity, they should be assigned only to that company’s specific Prospero entity. Following standard Prospero Security paradigms, these users will be unable to log into the consolidated entity or other entities to which they have no access.
For more information, see Security.
To establish consolidated access on the System Entity Management screen:
1. Log in to the System Entity using your system administrator account. For more information, contact Prospero Support.
2. Click on the Configuration bar in the Prospero Navigation Pane.
3. Click on the Entity icon to open the Entity Management workspace.

4. For the entity to be involved in the consolidation, select, or enter, the following:
•Entity Code – A code, or ID, which you assign to your Entity.
•Entity Name – The descriptive name which you assign to your Entity
•Administrator Role – The role in Prospero Security which you have designated can create, maintain, or remove Entities in Prospero. The Administrator Role value will default to the user/role creating the Entity.
•GL Linked – Check this option to indicate that the Entity and its’ associated data is linked to a General Ledger.
•Default Currency – Select the default currency for Prospero reporting. The default currency will be indicated on the Currency Definition workspace and will not be editable on that workspace.
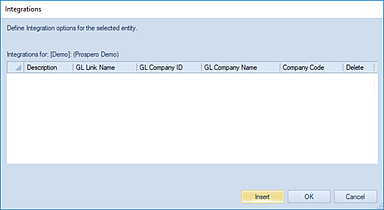
5. Select the ellipsis in the GL Link Name field. The Integrations screen will open:

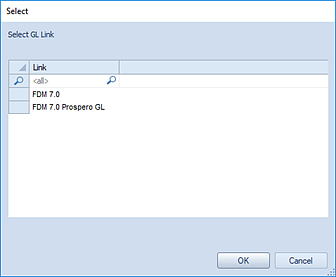
6. Select the Insert button to add a new entry row. The Select dialog will open:

7. Choose a GL Link for the entry from the dialog.
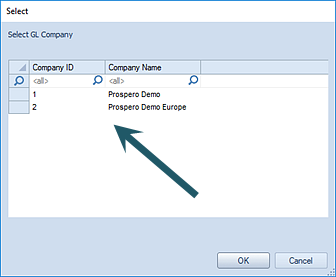
8. Click OK and the Select GL Company screen will open.

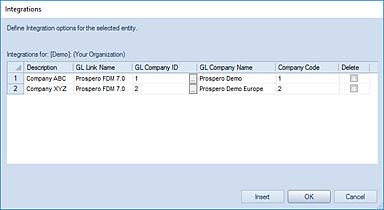
Select one or more items from the company list and click OK. The GL Company Name and Company Code will populate the Integrations screen with the information selected.

Note: For most General Ledgers,
the Company Code field will remain blank until after the Entity Management
Worksheet is saved.
9. Select the OK button so save your information.
Note: To add or delete entities using Entity Management, you must log in to the System Entity using an ID with permission to maintain entities. This is an Administrative-level permission. For more information, see the section on Prospero Security Permissions in Security. Once the entity is created, an Administrator can manage the GL Company connections within the specific Entity’s Entity Management Worksheet.
For information or assistance on establishing your entity GL structures, contact the MSX Group.