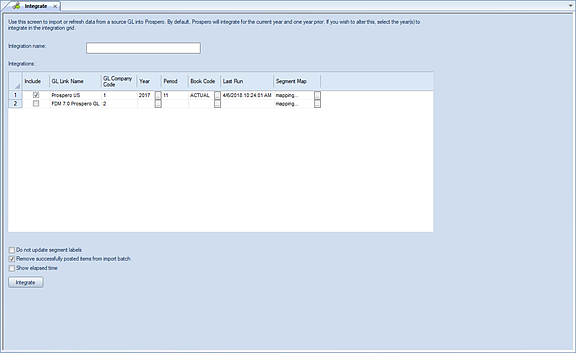
The Integrate function allows you to import or refresh data from a source GL to Prospero.
The Integrate feature is available when licensing Prospero for reporting-only and reporting and budgeting. When licensing Prospero for budgeting-only, data integration processes are not part of this module and this feature will not be available. For more information, refer to Security Permissions and Licensing.
To execute the Prospero Integration process:
1. Click on the Data Integration bar in the Prospero Navigation Pane.
2. Click on the Integrate icon to open the Data Integration workspace.

3. Enter the fields and options necessary for your Integration job. Fields and options on the workspace include the following:
•Integration name – This field specifies the name of the integration for identification later. The field can contain up to 24 characters. This is a required field.
•Include – This checkbox option allows you to select which companies to include in this integration.
•GL Link Name – This field shows the General Ledger Link Name linked to the Entity for which the integration is run. Refer to your Entity definition.
•GL Company Code – This field shows the General Ledger Code ID linked to the Entity for which the integration is run.
•Year – This field limits the integration to the year(s) specified. Click on the ellipsis button to view the dialog containing available years within the General Ledger’s calendar; available years will display in descending order by default and you can then select one or more years from the list to define your integration criteria. (Use the up or down arrow over the Year header to manage the sort.) Note: if the Year field is left blank, the integration will run for the current year and one year prior. You can clear any prior existing selections by clicking outside of the existing selection (or a new selection) and then clicking the OK button.
•Period – This field allows you to define the period(s) for the integration process. You can enter more than one character to represent multiple periods by separating each period value with a comma (,). Note: if the Period field is left blank, the integration will pull data for ALL periods as well as the beginning balance for the year(s) specified in the Year field.
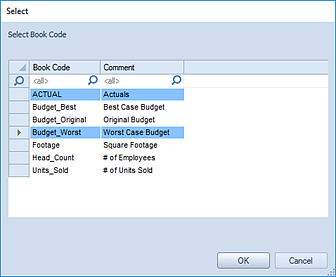
•Book Code – This field limits the integration to the book code value specified. Select the ellipsis to select a valid book code from the dialog which will populate the Book Code field. Note: if the Book Code field is left blank, the integration will pull all data for the year(s) and period(s) specified in the Year and Period fields.
You can clear any prior existing selections by clicking outside of the existing selection (or a new selection) and then clicking the OK button.

•Last Run – This field indicates the last time the integration was run.
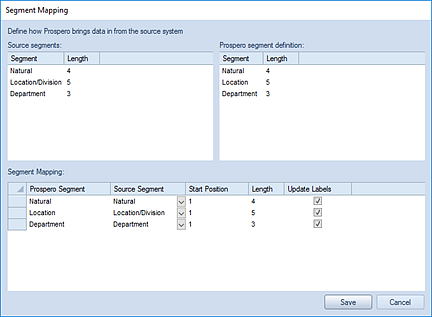
•Segment Mapping – Selecting the ellipsis in this field opens the Segment Mapping dialogue. On this dialog, you can view how Prospero integrates data from your sourced GL system.

The Source and Prospero segment definition sections are informational. The Segment Mapping section allows you to select how to map your source data to Prospero using the Source Segment pulldown option. You can also specify your data’s Start Position, Length and whether to update segment labels, where they differ between systems. It is recommended that you speak to your Prospero representatives before modifying this screen.
•Full load – When checked, this checkbox indicates that all data
should be pulled based on the settings in the Year, Period and Book Code fields,
so if any of these fields are limited the integration will pull all data within
those constraints. The Full Load option will re-load data from the General
Ledger even if it has previously been integrated into the Prospero Data
Warehouse.
If you do NOT check the Full load box, then an
iterative integration is run. In this case, the year and period fields are
ignored. Any data that has changed in the General Ledger since the last time the
integration was run will be pulled into the Data Warehouse.
If you
are missing any data or suspect that there might be missing data, use the Full
Load option to refresh the data warehouse for a given year or period.
Note: This option is not available for all Prospero-supported General
Ledgers.
•Do not update segment labels - When checked, this checkbox overrides the label setting for all segments and will skip the label update process for existing segment items. When unchecked, the integration will use the setting defined in the mapping screen (and if no mapping is defined, will update labels for all segments).
This setting will be stored for future integration process execution. This option is unchecked by default.
•Remove successfully posted items from import batch - This checkbox option allows you to remove successfully posted items from the batch. Where large amounts of data are processed, this option will limit the amount of time and data required as part of any re-post process.
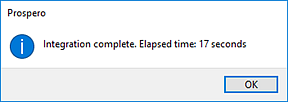
•Show elapsed time – When checked, this checkbox will provide the amount of time that the process took to run once completed.
4. Select the Integrate button to complete the data integration. (Using a descriptive name for the Integration is recommended.)
5. When
your Integration process has completed, you will receive a system message
notifying you to the effect. (If you checked the Show elapsed time checkbox you
will receive a message including the time that the process took to run.)

The Integration process will automatically run a Resummarize process when the process is executed.
In addition, the Integration process will be listed in the Activity log which is available from the Tools ribbon.

The Activity Log will include the Integration Name in the Information field and which GL Link Name is associated to the integration process in the Name field column. When the integration was run as well as who ran the job is also listed.
Note: If the segment lengths in the Segment Definition screen have been updated or changed in the Segment Definition screen, henceforth running the Integration process will not update the lengths of the segment definitions.