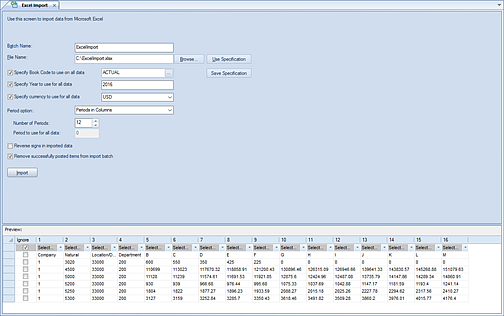
The Excel Import option allows you to import data using a Microsoft® Excel file to update specific segment information.
The file should be in .XLS or .XLSX format. The .CSV format is not supported.
If an Excel file has a password, you will be prompted to supply the password.
Note: When importing date values, use simple formats (i.e. 12/12/2019) such as those which do not include day of the week. For a sample Excel file format, refer to the file in your Prospero Client Directory.
To execute the Excel Import:
1. Click on the Data Integration bar in the Prospero Navigation Pane.
2. Click on the Excel Import icon to open the Excel Import workspace.

3. Enter a Batch Name. This allows field will be a label for the Excel import process up to 24 characters. The Batch Name field is a required field.
4. Enter or use the Browse button to select a File Name of the Excel file containing the data to be imported. The File Name field is a required field.
5. Once a
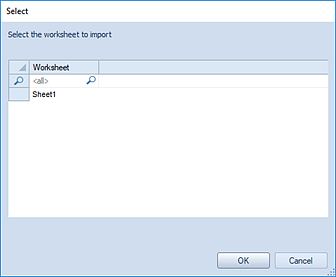
file is provided, you will be prompted to select the Excel worksheet tab within
the workbook containing import data.

If a <BLANK> worksheet is specified, you will receive an error message: "No importable data found in specified worksheet. Please select another worksheet."
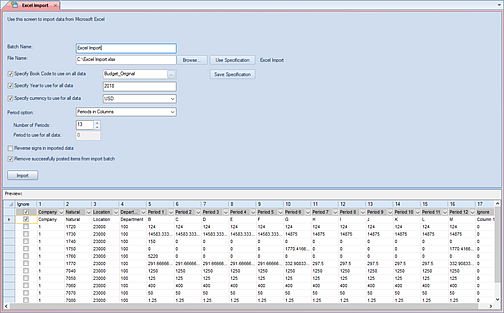
6. Select the Ok button. The data to be imported will appear in the Preview pane where you will map the segment field references to the data previewed.

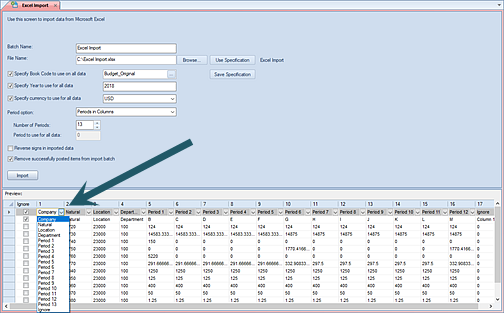
7. Map each field shown in the Preview. Each field must be unique and correspond to map-able segments or data.

If a field name is duplicated, you will receive an error message when you attempt your import process and the import will not proceed.
8. Use the checkbox to activate the Specify Book Code to use on all data field. When checked, you can use the ellipsis button to select a valid book code for which to import your data. (Only data associated to the specified book code can be imported.)
9. Use the checkbox to activate the Specify Year to use on all data field. When checked, you can enter the 4-digit year value associated to the imported data.
Note: By default, the year is derived from the current GL period. If the imported data’s year is less than the current system date (i.e. the calendar year), then the calendar year is provided by default. Otherwise, the current GL period's year is used.
10. Use the checkbox to activate the Specify Currency to use for all data field. When checked, you can use the dropdown to select the currency code from valid options specified in your system.
Conversely, you can specify the currency via the option in the preview grid to allow the import file to determine the data’s currency code. When using this option, the Excel Import process will verify that the currency code in the file is active in the currency list for the company. For more information see Currency Definition.
Note: While selecting the currency to use is optional, when not specified or if currency is not used, the process will use the default type. In this case, the currency code must be set on the import process or Excel import file and cannot be <BLANK>.
11. Select the Period option desired. This option indicates how periodic values will be applied to any data imported in using the process. Three options are available:
•Periods in Rows – This option indicates that period values are in the rows of the import file.
•Periods in Columns – This option indicates that the period values are in the columns of the imported data. When selected, the Number of Periods field is activated which allows you to directly enter or use the incrementor to specify the number of period columns to be imported. You can enter up to 3 digits in the field.
•Specify Period – This option indicates that a numeric period value will be applied for all data. When selected, the Period to use for all data field is activated in which you can specify a period number to use for all imported data. You can enter up to 3 digits in the field.
12. OPTIONAL: Select the Reverse signs in imported data. This option allows account types typically stored with credit balances (i.e. revenue accounts) to have the sign reversed before posting. As a result, data imported from the spreadsheet showing as "4000" will then post in to the database as "-4000". Do not check this box if the data in the spreadsheet already shows the natural sign.
13. OPTIONAL: Select the Remove successfully posted items from import batch. This checkbox option allows you to remove successfully posted items from the batch. Where large amounts of data are processed, this option will limit the amount of time and data required as part of any re-post process.
14. OPTIONAL: Select the Use Specification. This button option allows you to select an existing specification for importing your data. The list of available specifications will be those which you have previously saved. If you have not previously entered/saved a specification this screen will be <BLANK>.
15. OPTIONAL: Select the Save Specification button and enter a name to reference the import parameters, criteria and mappings in future. The CTRL+S on the open dialog will also save the specification name.
Note: You must specify an Excel file name for the Use Specifications or Save Specifications buttons to activate.
For more information see Import Specifications.
16. Select the Import button to import the data.
If errors occur during the posting process, you will receive a message that records have failed the validation process and were not posted: “Import completed with validation errors. Please check the import batch for details”. For more information, refer to View Import Batch.